Om nom nom

Om nom nom - Slang, indicating eating. Commonly used in lolcats and similar image macros. It usually translates as, “I am absorbed in eating this” or “OMG this is awesome eats, I’m eating it!" -knowyourmeme.com

Monday, March 28, 2011

Bow Tie Lasagna and Monster Cookies

Saturday evenings are usually the one day of the week where Sean's friend Garret comes over and we order in, but ordering in can get expensive. So this week I whipped up something easy and delicious. Then later we had a crazy craving for cookies, and went out to buy ingredients and I didn't get out of the kitchen until after midnight. But there was cookies. And they were good.

Also I was so busy you don't get any cast of characters shots today. Nyah.

Brown a pound of ground beef in a skillet, drain the fat.

Boil a box of noodles, drain and dump them in.

Add a little olive oil, 3 cups of your favorite spaghetti sauce, garlic powder, italian seasoning, salt

Then once that is mixed together, stir in some mozzarella cheese and some sour cream. Or in my case, some cottage cheese. CAUSE IT JUST FELT MORE LASAGNA-Y.

It was cheesy. And simple.
I love how stringy mozzarella cheese gets.

Sean had seconds. I was amazed. Garret had fourths.

Bow Tie Lasagna (original recipe here, but I first found it on Ree's site. Of course.)
  • 1 pound Ground Chuck
  • 5 cups Bow Tie Noodles (or 1 pound of pasta)
  • 3 cups Spaghetti Sauce (or Pizza Sauce, Whatever You Prefer)
  • 1 Tablespoon Olive Oil
  • 1 teaspoon Salt
  • ½ teaspoons Garlic Powder
  • 1 teaspoon Italian Seasoning (or More, Make It To Your Taste)
  • ½ cups Mozzarella Cheese
  • ½ cups Sour Cream (or ricotta cheese, or cottage cheese)
Fry ground chuck in small pan. Meanwhile, cook noodles according to package directions.

After noodles are cooked, drain and toss into skillet with meat. Mix in your spaghetti sauce.

Add your seasonings, cheese, and sour cream. Fold together and allow it all to combine and melt together, over low heat, for about 5 minutes, or until cheese is melted.
---------------------------

Yummers. The guys wouldn't stop raving about it. Just goes to show, the fanciest stuff isn't always needed.

Now, are you ready? Ready for COOKIES?!

I know I am.

Eggs and two kinds of sugar in a bowl! Mix it up!

Add softened butter, peanut butter, vanilla and salt!
I'll note I was doing this with just my arm so mixing the butter in took a bit of elbow grease. You could probably do the beginning part of the recipe with a mixer but after this step here, it will become too thick.

Nice and mixed up. And tasting really good.

Then add your M&Ms, chocolate chips, and raisins.
So pretty.

Then dump in 4 1/2 cups of quick cooking oats and 2 teaspoons of baking soda and mix well. Then you're done. Yeah, it has no flour. I guess it's the oats, peanut butter and eggs that give it substance. It's so good and chewy.

Scoop and bake!

I'm not sure why they're called monster cookies. Maybe everything cookies. They weren't very monster-y in size or anything. But who cares! They're delicious.

Monster Cookies (original recipe here, from Paula Deen)
  • 3 eggs
  • 1 1/4 cups packed light brown sugar
  • 1 cup granulated sugar
  • 1/2 teaspoon salt
  • 1/2 teaspoon vanilla extract
  • 1 12-ounce jar creamy peanut butter
  • 1 stick butter, softened
  • 1/2 cup multi-colored chocolate candies
  • 1/2 cup chocolate chips
  • 1/4 cup raisins, optional (Not optional for ME. And I upped it to 1/2 cup. I'd probably use even more next time.)
  • 2 teaspoons baking soda
  • 4 1/2 cups quick-cooking oatmeal (not instant)
Preheat the oven to 350 degrees F. Line cookie sheets with parchment paper or nonstick baking mats.

In a very large mixing bowl, combine the eggs and sugars. Mix well. Add the salt, vanilla, peanut butter, and butter. Mix well. Stir in the chocolate candies, chocolate chips, raisins, if using, baking soda, and oatmeal.

Drop by tablespoons 2 inches apart onto the prepared cookie sheets.

Bake for 8 to 10 minutes. Do not overbake. Let stand for about 3 minutes before transferring to wire racks to cool. When cool, store in large resealable plastic bags.
-------------------

Been a busy weekend. And last night I made meatloaf and cheese grits. Recipe to follow this week. Boy it made a lot of meatloaf, I really should have cut it in half. Oh well, leftovers week! 

Thursday, March 24, 2011

Chedder Corn Chowder and Parmesan Rolls

This is the meal I made for mom while she was visiting. It was delicious and I'm sorry to say that I was so busy cooking that I missed a lot of photo opportunities. So you can just look at what I have and read the recipe. It was minorly time consuming but everything I do takes forever, especially when I've never made it before. The recipe I'll post will be the whole one, I halved it. The halved recipe made a ton of soup too so unless you're feeding 12 people, you probably should too. I tweaked it minorly as well.

Bacon! My first time working with bacon. Potatoes, onion, garlic, half and half, butter, chicken broth and corn. Oh and chedder. Whoops forgot to put it in the picture.

First I diced up the bacon and my onion and garlic.

While my bacon was cooking in the pot, I diced my potatoes.

Then I cooked my onion and garlic in the bacon fat. I had set aside the bacon for later.

Then I added flour and spices.

After my roux cooked for awhile, I added my potatoes and chicken broth.

After that simmered for about 15 minutes, I turned the heat down, added my frozen corn, the half and half and the cheese. I also didn't think it would be thick enough so I mixed a little flour with some water into a thickener and added that in for the last bit of cooking time. Mmmm. Oh and then I dumped all that bacon right back in. Yeah, you heard me.

And there you have it, chedder corn chowder!

...

Whoops, that's just a bird from the zoo. Let's try that again.

And there you have it, chedder corn chowder!

It also happened to be St Patrick's day so I had a green drink in honor. Key Lime Cream! Ooh it was yummy.

Oh and if you're wondering about those parm rolls. Well, they were nothing special. I had leftover frozen dough balls from when I made those amazingly delicious pepperoni rolls, so following the instructions for Pioneer Woman's buttered rosemary rolls, I proofed them in the oven, when they were done I covered them in melted butter and instead of rosemary, I used parmesan cheese.

And then I baked them.
And then we ate them! They were pull apart and nummy.

Now he's the soup recipe. I got the original from Ina Garten's cookbook but I found the recipe on foodnetwork.com to look at reviews. The biggest complaint was that it was too soupy at 12 cups of chicken broth, so when I halved the recipe I only added 4 cups instead of 6 to start. Then I realized I had a lot of potatoes and added the other two cups. And then probably a little more. You can always thicken a soup up if it's a bit thin.

Oh and even though I halved the recipe, I used a full pound of bacon. And skipped the olive oil. And used a lot less onion.

Chedder Corn Chowder (original recipe from Ina Garten)
  • 8 ounces bacon, chopped
  • 1/4 cup good olive oil
  • 6 cups chopped yellow onions (4 large onions)
  • 4 tablespoons (1/2 stick) unsalted butter
  • 1/2 cup flour
  • 2 teaspoons kosher salt
  • 1 teaspoon freshly ground black pepper
  • 1/2 teaspoon ground tumeric
  • 12 cups chicken stock
  • 6 cups medium-diced white boiling potatoes, unpeeled (2 pounds)
  • 10 cups corn kernels, fresh (10 ears) or frozen (3 pounds)
  • 2 cups half-and-half
  • 1/2 pound sharp white chedder cheese, grated (I used regular)
In a large stockpot over medium-high heat, cook the bacon and olive oil until the bacon is crisp, about 5 minutes. Remove the bacon with a slotted spoon and reserve. Reduce the heat to medium, add the onions and butter to the fat, and cook for 10 minutes, until the onions are translucent.

Stir in the flour, salt, pepper, and turmeric and cook for 3 minutes. Add the chicken stock and potatoes, bring to a boil, and simmer uncovered for 15 minutes, until the potatoes are tender. If using fresh corn, cut the kernels off the cob and blanch them for 3 minutes in boiling salted water. Drain. (If using frozen corn you can skip this step.) Add the corn to the soup, then add the half-and-half and cheddar. Cook for 5 more minutes, until the cheese is melted. Season, to taste, with salt and pepper. Serve hot with a garnish of bacon.

If it isn't cheddery enough for you, add more chedder! If it needs more tumeric, add some more. Play with it and check your seasonings. Sean and mom loved it, and so did I.

Yum.

Make it for your mommy today!

Wednesday, March 23, 2011

Strawberry Coffee Cake

When I first started looking at food blogs, and I mean like, the second blog I ever looked at, the one I checked from beginning to end and became obsessed with, was a cute little blog written by a sweet lady named Sherry. It was called "What Did You Eat?" and I'm sorry to say that by the time I got there, the most recent post was a memorial her husband had put up because she had lost her life to a sudden heart attack, though apparently she was no stranger to health problems by the end. Anyway my point is that I loved this woman's blog and it got me started on my road to blogdom. I know I go on and on about Ree (Pioneer Woman), but Sherry's blog will hold a place in my heart and I plan to make more of her delicious food. Her blog is where I found this cake's recipe and I thought of her while I made it. (Even though she got it from another friend's blog. Har.)

Oh boy. This cake was good. And super easy. And I mean that. The longest part was making the crumbley topping and that was only annoying because the butter started to melt. I could have put it back in the fridge for a bit but I was in a hurry. I made this cake while mom was visiting and the 6 people besides me who tried it all thought it was really good. You should try it too, it took no time to whip up!

If you leave it covered and on the counter, the topping will lose some of its crispness from the moist berries underneath and it isn't quite as delectable as the first few days so try to polish it off quickly. Next time I make it I'll store it in the fridge and see if that helps. Maybe I should have done that in the first place. OH WELL.

I didn't make a cast of characters shot because I was in a hurry. Butter, flour, sugar, baking powder, salt, cinnamon, vanilla, milk, eggs, and strawberries. Honestly the only thing I had to buy for it was the berries, everything else was on hand.

Dry ingredients in a bowl. Sift them if you're fancy. One day I'll be fancy.
Yeah I know, shadow. SORRY I AM NOT AMAZING AT TAKING PICTURES. The lighting in my apartment is so all over the place. I quit.

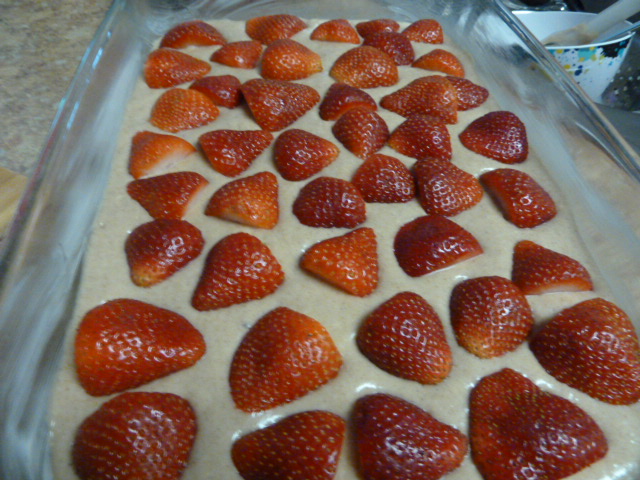
Slice your berries in half! The recipe calls for 3 cups of berries and I found that one of those packages you buy from the store was almost exactly enough to make a layer over the top of the batter with only a few leftover to eat.

Wet ingredients and melted butter. Oh I just realized I forgot to take a picture of the crumbles and the making thereof. Oh well. You'll all figure it out, it's pretty simple.

Mix your wet and your dry ingredients together till combined. Smelling so yummy already. I love cinnamon in baked goods, it makes me happy.

Pour that batter into a greased 9x13 pan or baking dish and layer all your strawberry halves on top. Isn't it pretty?

Take your crumbles from the fridge and spread all over the top.

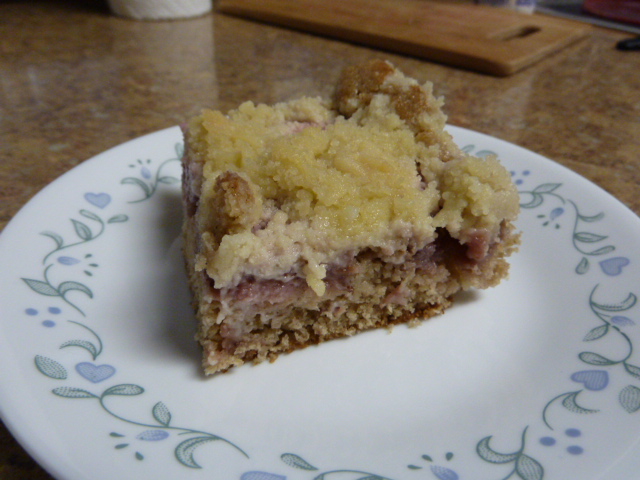
Then bake! Oh the finished cake is neat looking. Little pools of berry juice, bits where the cake has risen up over everything. Boy is it good.

Do yourself a favor and make this today. Or tomorrow. Just make it.

Strawberry Coffee Cake (original recipe by Butta Buns, recipe gotten from here)
Crumble Topping
  • 1 c. flour
  • 1/2 c. sugar
  • 1 stick of margarine (stick form is necessary), cold from the fridge  (I'm a hopeless butter fanatic--so I used it instead.)
To make crumble topping, sift the sugar and flour together in a large bowl. Place the margarine in the center of the bowl and sprinkle a little of the sugar and flour mixture over it. Place all 10 fingers on the stick and start crumbling it by making cat-kneading gestures with your fingers so the margarine turns into little pea sized bits. If you need a visual, refer to this little fella. Keep crumbling until the stick is completely whittled down.
Keep the bowl of crumbles in the fridge until you’re ready for it.

Strawberry Coffee Cake
  • 2 c. flour
  • 1 c. sugar
  • 2 tbsp. baking powder
  • 1 tsp. salt
  • 2 tsp. cinnamon
  • 2 tsp. vanilla extract
  • 1 c. milk
  • 2 eggs
  • 1/4 c. margarine, melted (Again, like Paula Deen, I use butter!)
  • 3 c. strawberries, sliced
-Sift the first four ingredients together in a bowl and set aside
-Whisk the milk, eggs, vanilla, and melted margarine together in a bowl.
-Add the mix of wet ingredients to the bowl of dry ingredients.
-Beat together with a handheld mixer until well incorporated.
Pour into a pre-greased 13×9 pan. Arrange the sliced strawberries on top of the batter. Sprinkle the crumble toppings.
Bake at 350F for 35-45 minutes.

Thank you for this great recipe, Butta Buns and thank you Sherry for the delicious cake and for starting my addiction to food blogs.

Soooo gooooood.

Also, I miss my mommy. :(

Tuesday, March 15, 2011

Cheesy Cauliflower Bake with Panko Crumbs

I had had my eye on this one for awhile. I haven't had cauliflower in what feels like forever and I really do enjoy it when it's made right. I plan on making something later this week so I figured I better hurry and get this up before I get too many things waiting in the wings to be posted like around Superbowl. Mom has been keeping me busier than usual, I'm pretty exhausted. Only 5 more days to go counting today. We went to the Zoo on Sunday, it was pretty busy. Mom's feet are bothering her so we aren't going to Galveston with Carrie and Tina today. I'll find something for us to do. Also, I HATE TIME CHANGE. DST can go away forever. Losing an hour just messes me up. So tired.

Anyway on with the cauliflower! It was really easy.

You'll need cauliflower, butter, olive oil, flour, some kind of grated cheese (not that much, I grated extra), milk, chicken broth, garlic, fresh or dried thyme, cayenne pepper, dijon mustard (or dry mustard if it's all you have) and salt and pepper. Oh and some Panko! Those are japanese breadcrumbs. They are very crunchy.

Cut your cauliflower into florets. I always thought cauliflower looked so neat. It looks like little trees kinda like broccoli but it's one solid mass. So neat.
Anyway, stick those in a microwavable bowl with 1 inch of water and cover with plastic wrap or something. Microwave for 3-5 minutes. I did mine on high for 4 and they came out still kind of crunchy, which is what you're looking for. The final baking doesn't effect them THAT much.

Make a roux by heating the oil and butter over medium heat. Now, I left it on the heat a bit too long while I did something and it clearly got too hot because my first roux burned less than 30 seconds after it went in. So I dumped it and started again. This time I used medium low heat and added the flour just after the butter finished melting. Muuuuch better.

Cook it for awhile then add your milk. It will still be pretty thick.
As you can see. Add in your minced garlic.

Add in the chicken stock, a little at a time, until the sauce thins out.

Reduce your heat to low and add your cheese, stirring to melt it. Add all your other seasonings and spices and whatever.

Put your cauliflower into a baking dish (I just grabbed one that looked big enough) and pour the sauce over, making sure you stir it around a little to get under all the veggies.

Mix your panko with enough olive oil to moisten the crumbs up nicely, about 1 tbsp.

Spread those babies on top and bake in the oven. Tada!

The verdict: It was good. Really good. And if I could ever find a low fat cheese that didn't suck it could be made even lower in fat. A cream sauce with only a little bit of milk and not a lot of butter? That is far better for you than this dish could have been. And it was delicious. It really was easy. Here's the recipe!

Cheesy Cauliflower Bake with Panko Crumbs (original from FoodieWife's blog here)
  • 1 medium head cauliflower, cut into small florets
  • 2 tablespoons butter
  • 2 tablespoons olive oil
  • 4 tablespoons flour
  • 1/2 cup reduced fat cheddar cheese (or not low fat)
  • 3/4 cup milk
  • 3/4 cup low sodium chicken broth
  • 1 garlic clove, minced
  • 1 tsp dried or fresh thyme
  • 1/8 tsp cayenne pepper (optional)
  • 1/2 tsp dijon mustard (or dry mustard powder)
  • kosher salt and pepper to taste
  • 3/4 cup of Japanese Panko crumbs and 1 tbsp olive oil for topping
Preheat the oven to 350F.

Cut the cauliflower into even-sized florets, rinse and drain. Microwave in a bowl, with about 1" of water, covered in plastic for 3-5 minutes (depending on your microwave power). Remove the plastic wrap and set aside - you want the florets to be slightly crunchy still.

For the sauce: Melt the butter and olive oil on medium heat. Whisk the flour in and cook for 1-2 minutes, until it becomes thicker. Add the milk and continue whisking. The sauce should get very thick. Add the minced garlic. Add the chicken stock, a little at a time, until the sauce has thinned out enough to be pourable. Reduce heat to low and add the grated cheese, stirring until it is completely melted. Add the thyme, then season carefully with salt and pepper, mustard and cayenne. Give the sauce one final taste and adjust final seasonings to your preference.

In a small bowl, drizzle enough olive oil to slightly moisten the panko crumbs. Regular bread crumbs are okay but panko crumbs are much crunchier. Combine with a fork and set aside. You can also add some thyme to the crumbs if you want.

Pour the cauliflower into a casserole dish (or individual ramekins). Carefully pour and distribute the cheese sauce evenly. Sprinkle the panko crumbs on top.

Bake at 350F for 20-25 minutes, or until lightly golden and bubbly.

By using low-fat milk, healthier olive oil and butter, and reduced fat cheese (if you can find it), this otherwise very high caloric dish is equally flavorful and delicious.

Mmmm look at that.
I served it with some shredded beef brisket. Not homemade, don't get all excited. It was really really good. I hope you think so too!

Friday, March 11, 2011

Chili dogs

Yay chili dogs! One of my favorite things. I saw this recipe for a thicker chili in Pioneer Woman's cookbook that I now own. So I tried it out!

Ground beef, chili powder, ground oregano, cayenne pepper, salt, tomato sauce, garlic. Not pictured, cumin, because I forgot to bring it over. Onion powder because I like it. And that yellow stuff in the hello kitty bowl is masa. Corn flour! You'll see what that's for later.

Ground beef and garlic in a pot. Cook it! I used medium to medium high heat. Man it smelled good.

Once the meat is browned and drained of fat, add your tomato sauce, and all your spices.

Mix it up and turn the heat to low, cover and simmer for 1 hour stirring occasionally. If it seems like it's getting dry, add 1/2 cup of water at a time as needed.

After the hour is up, mix your masa with 1/2 cup of water until nice and smooth. Pour some into your chili!
This not only thickens the meat and gives it a beautiful consistency but the corn flavor it gives is wonderful.

This is the point where you could add beans or a can of rotel or more masa or whatever if you wanted. I added a lil more of my masa mix and left it alone. Next time I'd add some rotel. Simmer for 10 minutes.
Delicious!

I made some hot dogs and grated some sharp chedder and voila.

Yum! I definitely liked it. But I wouldn't make it my go to chili for eating with a spoon. Maybe I have mom's chili on the brain. I should get her to give me the recipe sometime.

Anyway here is this one! I halved the recipe when I made it.

Simple Chili (original recipe from Pioneer Woman)
  • 2 garlic cloves, chopped
  • 1 teaspoon ground oregano (I just took my dry oregano and crushed the heck out of it until it was more ground up)
  • 1 tablespoon ground cumin
  • 1/4 teaspoon cayenne pepper (optional)
  • 2 tablespoons chili powder
  • 2 pounds of ground beef
  • 8 oz can of tomato sauce
  • 1 teaspoon salt
  • 1/4 cup of masa (corn flour, found in the mexican food section of many supermarkets)
1) Begin by measuring out your spices if you wish.

2) Place the ground beef and garlic in a large pot. Cook the beef until brown over medium to medium high heat. When fully cooked, drain the excess fat.

3) Pour in the tomato sauce, followed by all the spices and salt.

4) Stir together well, cover and reduce heat to low. Keeping the pot covered, simmer for 1 hour, stirring occasionally. If the mixture becomes overly dry, add in 1/2 cup of water at a time as needed.

5) After an hour, place the masa in a small bowl. Add 1/2 cup of water and stir together with a fork. Dump the masa mixture into the chili.

6) Stir together well. Taste, adjust seasonings, and add more masa paste and/or water to get the chili to your desired consistency or to add more corn flavor. Add some beans, jalapenos and tomatoes if desired. Simmer for 10 minutes.

Mom is coming in to visit tomorrow. It's gonna be a long week! But I should at least make a few things to post. Maaaaybe.